When you’re documenting a single fiber, a fingerprint ridge, or the tiny scratch on a bullet casing, you’re not just taking a photo-you’re preserving a piece of evidence that could change the outcome of a case. Macro photography isn’t just for flower petals or insects. In forensic work, it’s the difference between a blurry guess and a court-admissible detail. The smallest things matter most here, and getting them right means mastering the basics-and then pushing past them.
Why Macro Photography Matters in Evidence Collection
Standard cameras don’t capture what a microscope can. But a microscope can’t show context. That’s where macro photography steps in. It bridges the gap: showing the exact size, texture, and positioning of tiny evidence without losing its surroundings. A torn fabric thread? You need to see the weave pattern. A tool mark? You need to see the angle and depth. A single grain of sand on a shoe? That’s not just dirt-it could link a suspect to a location.
Forensic photographers don’t have the luxury of retakes. Evidence moves. Scenes get cleared. If your photo doesn’t show the detail clearly the first time, you lose it forever. That’s why technique matters more than gear.
Equipment You Actually Need
You don’t need a $3,000 camera. But you do need three things: a camera with manual controls, a true macro lens, and a tripod that doesn’t wobble.
A dedicated macro lens is a lens designed to focus extremely close and produce a 1:1 reproduction ratio. This means the subject on your sensor is the same size as in real life. Lenses in the 60mm to 105mm range work best. A 60mm lets you get closer-useful for stationary items like coins or paper evidence. A 90mm or 105mm gives you breathing room-critical when photographing live insects, fragile trace evidence, or when you can’t get too close to the scene.
Extension tubes? They’re cheap. They work. But they remove your lens’s ability to focus at infinity and can reduce light. Reverse adapters? They magnify, but you’re shooting with the lens backward-no autofocus, no aperture control, and a higher risk of dust getting inside. Stick with a real macro lens if you can. If you’re on a budget, rent one. Evidence photography isn’t the place to cut corners.
Your tripod needs to be solid. Not just sturdy-rock-solid. Even a breeze or a footstep can shake the camera enough to blur a 1:1 image. Use a ball head with independent pan and tilt controls. A geared head is ideal if you’re doing repeated shots or focus stacking. And always use a remote shutter release or the camera’s timer. No touching the camera. Not even a light tap.
Camera Settings That Make or Break the Shot
Here’s where most people fail. They think “more detail” means “bigger aperture.” It’s the opposite.
At close distances, depth of field is razor-thin. At f/2.8, you might have only 2 millimeters of focus. That means if you focus on the tip of a hair, the base is blurry. If you focus on the base, the tip is gone. So you need to stop down.
Start at f/8. That gives you a decent balance between sharpness and depth. If you need more in focus, go to f/11. Then f/16. Some lenses go to f/22 or f/32. Yes, diffraction kicks in at those settings-your image gets a little softer overall. But that’s better than having half your evidence out of focus. You can fix softness in post. You can’t fix missing detail.
ISO? Keep it low. ISO 100 or 200. Noise is easier to remove than blur. If you’re in low light, don’t crank up ISO. Use more light. Or use a longer exposure. With a tripod, shutter speed isn’t a problem. Use 1/15s, 1/8s, even 1/4s if needed. The key is stability. If your camera is still, motion doesn’t exist.
Manual focus is non-negotiable. Autofocus will hunt. It’ll lock on the wrong part. You need to see exactly what’s in focus. Zoom in on the live view. Move the focus ring slowly. Check the edge of the evidence. Is it sharp? Move a little. Check again. Do this until you’re certain.

Focus Stacking: The Secret Weapon
Even f/22 won’t get everything sharp if your subject has depth. A coin with raised lettering? A bug with legs and antennae? A layered piece of fabric? You need focus stacking.
This isn’t magic. It’s methodical. You take 10, 20, even 50 shots-each focused on a slightly different plane. Start at the front of the subject. Take a shot. Move the focus ring a tiny bit toward the back. Take another. Keep going until the back edge is sharp.
Use a focusing rail on your tripod. It slides the whole camera forward and back in precise 0.1mm increments. That’s how pros do it. You can do it manually, but it’s harder. Software like Helicon Focus or Zerene Stacker combines the images. The result? A photo where every part-from front to back-is razor-sharp.
It takes time. But in evidence work, time is what you have. And a clear, complete image is worth every minute.
Lighting: Natural, Controlled, and Strategic
Harsh sunlight? Bad. It creates glare on shiny evidence and deep shadows that hide texture.
Use diffused light. A white sheet or a professional diffuser panel softens sunlight. A ring flash? Good for consistent lighting, but it can flatten detail. Use it with a diffuser. A small LED panel? Even better. You can angle it to highlight ridges, grooves, and textures.
Try backlighting. Shine a light from behind a translucent object-like a fiber or thin paper-to reveal internal structure. Side lighting? Essential for showing surface texture. A single light from the side creates shadows that make scratches, prints, and patterns pop.
Never shoot in full shade. Flat light kills contrast. You need shadow to show shape. Use reflectors-white foam core, even a piece of paper-to bounce light into dark areas without adding harsh highlights.
Composition: Context Is Evidence Too
A photo of a single fingerprint isn’t enough. You need to show where it was found-on the handle of the knife, next to the blood spatter, near the broken lock.
Always include a scale. A ruler. A coin. Something with known dimensions. Place it next to the evidence. Shoot it at the same angle. This isn’t optional-it’s required for court.
Don’t crop too tight. Leave room around the subject. You never know what you’ll need to analyze later. A tiny speck of dirt on the edge? Could be trace evidence. Leave it in.
Use layers. If you’re photographing a broken piece of glass, include the surrounding surface. Show how the shards lie relative to each other. That tells you the direction of force. That’s forensic storytelling.

Pitfalls and How to Avoid Them
Blurry images? Probably camera shake. Or autofocus failure. Always use manual focus and a tripod.
Dust spots? They’re inevitable. Clean your sensor before every session. Shoot at f/16 or higher and you’ll see every speck. Clean again after. Use a rocket blower, not a brush.
Overexposed highlights? Check your histogram. Don’t rely on the screen. A bright reflection on metal can blow out detail forever. Use a polarizer if needed.
Underexposed shadows? Add light. Don’t boost ISO. It adds noise. Noise hides fine texture.
Forget to document the scene? Always shoot a wide shot first. Then mid-range. Then close-up. Then macro. That’s the sequence. You can’t reconstruct context from a macro shot alone.
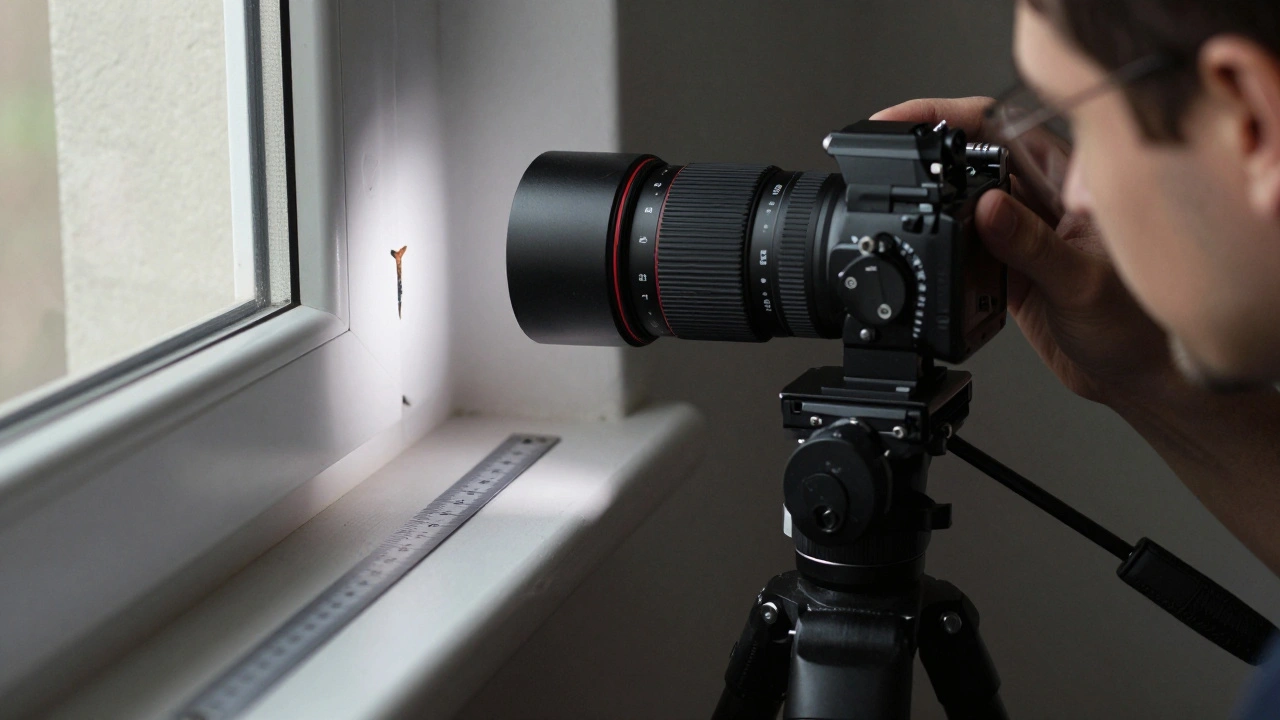
Real-World Example: Documenting a Tool Mark
Imagine a pry mark on a window frame. It’s 3mm wide. You need to show the pattern, depth, and edge sharpness.
You set up a 105mm macro lens on a tripod. Use f/16. ISO 100. Manual focus. Zoom in. Focus on the top edge. Take a shot. Move focus slightly down. Take another. Repeat until the bottom edge is sharp. You took 18 shots. You stack them. The result? A single image where every ridge of the tool is visible.
You place a ruler next to it. You shoot from two angles: straight on and 45 degrees. You take a wide shot showing the entire window. You label the file: Evidence_0427_2026_ToolMark_WindowFrame.
That’s not photography. That’s documentation. And it’s the standard.
Final Thought: Precision Over Art
Macro photography for evidence isn’t about creativity. It’s about accuracy. No filters. No artistic blur. No dramatic contrast. Just truth. Every pixel must serve the facts.
The goal isn’t to make a beautiful image. The goal is to make an undeniable one.
Do I need a full-frame camera for forensic macro photography?
No. Crop-sensor cameras work fine. What matters is sensor resolution and manual controls. A 24MP APS-C camera with a good macro lens will outperform a low-resolution full-frame setup. Focus on lens quality and stability, not sensor size.
Can I use smartphone macro lenses for evidence?
Not for court. Smartphone lenses lack the resolution, manual control, and consistency required for forensic documentation. They’re useful for quick reference shots at the scene, but never as the primary record. Always use a dedicated camera with proper settings.
What’s the best aperture to start with for macro evidence shots?
Start at f/11. It gives you a good balance of depth of field and sharpness. If the subject is flat, f/8 is fine. If it has depth-like a coin, a fingerprint, or a broken tool-go to f/16 or f/22. Always check the live view zoomed in to confirm focus.
Is focus stacking necessary for every macro shot?
No. Only if the subject has depth. A flat fingerprint on glass? One shot at f/11 is enough. A beetle with legs and antennae? You need 15+ shots stacked. Use focus stacking when you need front-to-back sharpness. Skip it if the subject is mostly flat.
How do I prevent dust spots in macro photos?
Clean your sensor before every session. Shoot at smaller apertures (f/16+) to make dust visible. Use a rocket blower-not a brush-to remove particles. Always cap the lens when not shooting. Dust on the sensor shows up as dark spots in high-detail areas. It’s easy to miss, but hard to fix in post.